作为一个前端,给元素添加事故是一件司空见惯的事情。可是在Canvas中,其所画的任何东西都是无法获取的,更别说添加事故,那么我们对其就一筹莫展了吗?固然不是的!我们在寻常项目中肯定都用过很多Canvas的框架,我们发现事故在这些框架中已经利用的十分成熟了,而且并没有出现特别严重的题目。那么我们可以肯定的是,事故在Canvas中并不是一个无法触及的事情。 一个傻瓜式的方式我们都知道一个元素在触发一个事故时,其鼠标的位置基本处于该元素之上,那么我们就自然而然的想到通过当前鼠标的位置以及物体所占据的位置举行比对,从而我们就能得出该物体是否应触发事故。这种方式比较简单,我就不用代码演示了,不外既然我叫它傻瓜式的方式,很明显它不是一个有效的办理方式。由于物体所占据的位置并不一定是十分容易获取,如果是矩形、圆形等我们还能通过一些简单的公式获取其占据的位置,可是在复杂点的多边形,以致是多边形的某些边是弧线的,显而易见,我们这时间再获取其所占据的位置时是一件极其复杂且难度极大的事情,以是这种方式只适合自己在做一些demo中利用,并不适用于大多数的情况。 一个较聪明的方式既然上面这种方式碰钉子了,那么我们只能另辟蹊径。在翻阅CanvasAPI的时间,找到了一个方法isPointInPath,貌似正是我们苦苦寻找的良药。 介绍isPointInPathisPointInPath的作用:顾名思义,我们很直观的可以知道该方法用以判断点是否处于路径当中。 isPointInPath的入参出参:ctx.isPointInPath([path, ]x, y [, fillRule]),该方法的参数有4个,其中path和fillRule为选填,x和y为必填。我们依次介绍4个参数。 path:看到这个参数,我开始以为是beginPath或者closePath的返回值,很惋惜的是这两个方法并没有返回值,在查阅了资料后,发现是Path2D构造函数new的对象。Path2D构造函数具体用法。不外惋惜的是该方法大概由于兼容性的题目,目前看了一些开源框架都还未利用。 x,y:这两个参数很好理解,就是x轴和y轴的距离,必要注意的是,其相对位置是Canvas的左上角。 fillRule:nonzero(默认),evenodd。非零围绕规则和奇偶规则是图形学中判断一个点是否处于多边形内的规则,其中非零围绕规则是Canvas的默认规则。想具体了解这两种规则的,可以自己去查阅资料,这里就不增加篇幅介绍了。 上面介绍完了入参,那么isPointInPath方法的出参想必各人都可以猜到了,就是true和false。 利用isPointInPath上一节介绍完isPointInPath方法后,我们现在就来利用它吧。 先来一个简单的demo: [code] const canvas = document.getElementById('canvas') const ctx = canvas.getContext('2d') ctx.beginPath() ctx.moveTo(10, 10) ctx.lineTo(10, 50) ctx.lineTo(50, 50) ctx.lineTo(50, 10) ctx.fillStyle= 'black' ctx.fill() ctx.closePath() canvas.addEventListener('click', function (e) { const canvasInfo = canvas.getBoundingClientRect() console.log(ctx.isPointInPath(e.clientX - canvasInfo.left, e.clientY - canvasInfo.top)) }) [/code]
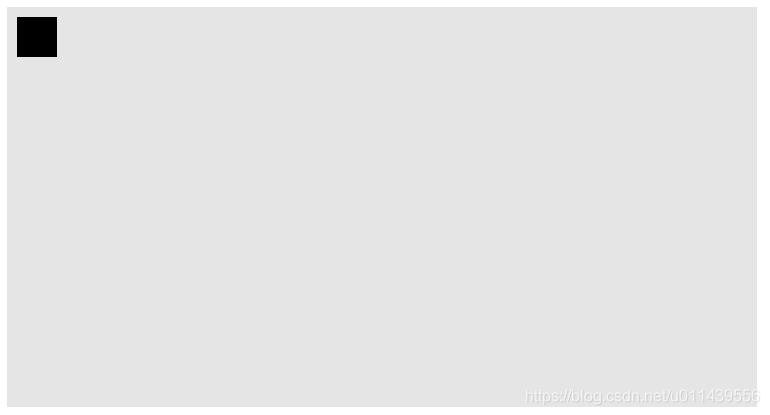
如图所示,灰色部门为Canvas所占据的区域,黑色为我们实际添加事故的区域,在我们点击黑色区域后,实际也的确如我们所愿,打印出来的值为true。貌似Canvas的事故监听就这么简单的办理了,不外事情真有这么简单吗。显然是不大概的!我们再来举个例子,这时间有两个区域,而且我们必要分别给其绑定差异的事故: [code] const canvas = document.getElementById('canvas') const ctx = canvas.getContext('2d') ctx.beginPath() ctx.moveTo(10, 10) ctx.lineTo(10, 50) ctx.lineTo(50, 50) ctx.lineTo(50, 10) ctx.fillStyle= 'black' ctx.fill() ctx.closePath() ctx.beginPath() ctx.moveTo(100, 100) ctx.lineTo(100, 150) ctx.lineTo(150, 150) ctx.lineTo(150, 100) ctx.fillStyle= 'red' ctx.fill() ctx.closePath() canvas.addEventListener('click', function (e) { const canvasInfo = canvas.getBoundingClientRect() console.log(ctx.isPointInPath(e.clientX - canvasInfo.left, e.clientY - canvasInfo.top)) }) [/code]
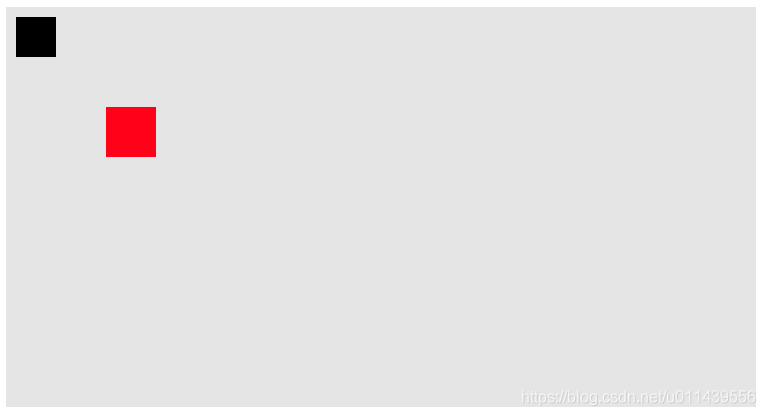
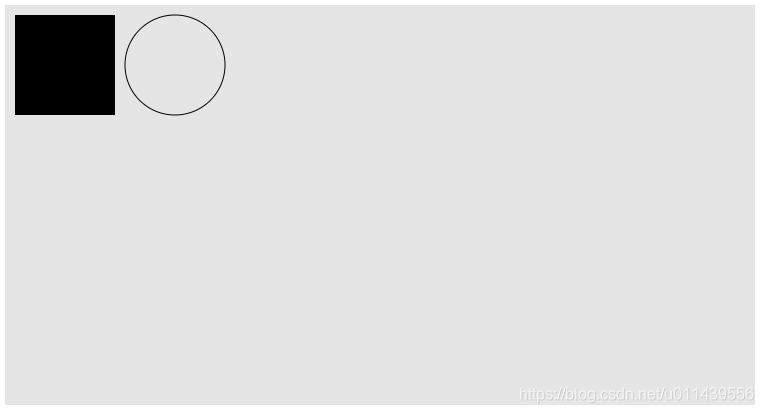
这个时间,结果就不再犹如我们所预计的一样,当点击其中黑色区域时,打印的值为false,点击赤色区域时,打印的值为true。 实在原因很简单,由于上述代码,我们实际创建了两个Path,而isPointInPath方法实际只检测当前点是否处于末了一个Path当中,而例子中赤色区域为末了一个Path,以是只有点击赤色区域时,isPointInPath方法才能判断为true。现在我们改造一下代码: [code] const canvas = document.getElementById('canvas') const ctx = canvas.getContext('2d') let drawArray = [] function draw1 () { ctx.beginPath() ctx.moveTo(10, 10) ctx.lineTo(10, 50) ctx.lineTo(50, 50) ctx.lineTo(50, 10) ctx.fillStyle= 'black' ctx.fill() } function draw2 () { ctx.beginPath() ctx.moveTo(100, 100) ctx.lineTo(100, 150) ctx.lineTo(150, 150) ctx.lineTo(150, 100) ctx.fillStyle= 'red' ctx.fill() ctx.closePath() } drawArray.push(draw1, draw2) drawArray.forEach(it => { it() }) canvas.addEventListener('click', function (e) { ctx.clearRect(0, 0, 400, 750) const canvasInfo = canvas.getBoundingClientRect() drawArray.forEach(it => { it() console.log(ctx.isPointInPath(e.clientX - canvasInfo.left, e.clientY - canvasInfo.top)) }) }) [/code]上面的代码我们举行了一个很大的改造,我们将每个Path放入到一个单独的函数当中,并将它们push到一个数组当中。当触发点击事故时,我们清空Canvas,并遍历数组重新绘制,每当绘制一个Path举行一次判断,从而在调用isPointInPath方法时,我们能实时的获取当前的末了一个Path,进而判断出当前点所处的Path当中。 现在我们已经间接的实现了对每个Path的单独事故监听,可是实在现的方式必要一次又一次的重绘,那么有办法不必要重绘就能监听事故吗? 首先我们必要知道一次又一次重绘的原因是由于isPointInPath方法是监听的末了一个Path,不外我们在介绍这个方法的时间,说过其第一个参数是一个Path对象,当我们转达了这个参数后,Path就不再去取末了一个Path而是利用我们转达进去的这个Path,现在我们来个demo来验证其可行性: [code] const canvas = document.getElementById('canvas') const ctx = canvas.getContext('2d') const path1 = new Path2D(); path1.rect(10, 10, 100,100); ctx.fill(path1) const path2 = new Path2D(); path2.moveTo(220, 60); path2.arc(170, 60, 50, 0, 2 * Math.PI); ctx.stroke(path2) canvas.addEventListener('click', function (e) { console.log(ctx.isPointInPath(path1, e.clientX, e.clientY)) console.log(ctx.isPointInPath(path2, e.clientX, e.clientY)) }) [/code]
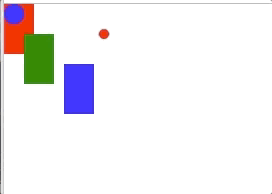
如上图所示,我们点击了左边图形,打印true,false;点击右边图形,打印false,true。打印的结果表明是没有题目的,不外由于其兼容性另有待增强,以是目前建议还是利用重绘方式来监听事故。 结语Canvas的事故监听讲到这里基本就差不多了,原理很简单,各人应该都能把握。 github地点 欢迎start 附录自己写的一个demo [code] const canvas = document.getElementById('canvas') class rectangular { constructor ( ctx, { top = 0, left = 0, width = 30, height = 50, background = 'red' } ) { this.ctx = ctx this.top = top this.left = left this.width = width this.height = height this.background = background } painting () { this.ctx.beginPath() this.ctx.moveTo(this.left, this.top) this.ctx.lineTo(this.left + this.width, this.top) this.ctx.lineTo(this.left + this.width, this.top + this.height) this.ctx.lineTo(this.left, this.top + this.height) this.ctx.fillStyle = this.background this.ctx.fill() this.ctx.closePath() } adjust (left, top) { this.left += left this.top += top } } class circle { constructor ( ctx, { center = [], radius = 10, background = 'blue' } ) { this.ctx = ctx this.center = [center[0] === undefined ? radius : center[0], center[1] === undefined ? radius : center[1]] this.radius = radius this.background = background } painting () { this.ctx.beginPath() this.ctx.arc(this.center[0], this.center[1], this.radius, 0, Math.PI * 2, false) this.ctx.fillStyle = this.background this.ctx.fill() this.ctx.closePath() } adjust (left, top) { this.center[0] += left this.center[1] += top } } class demo { constructor (canvas) { this.canvasInfo = canvas.getBoundingClientRect() this.renderList = [] this.ctx = canvas.getContext('2d') this.canvas = canvas this.rectangular = (config) => { let target = new rectangular(this.ctx, {...config}) this.addRenderList(target) return this } this.circle = (config) => { let target = new circle(this.ctx, {...config}) this.addRenderList(target) return this } this.addEvent() } addRenderList (target) { this.renderList.push(target) } itemToLast (index) { const lastItem = this.renderList.splice(index, 1)[0] this.renderList.push(lastItem) } painting () { this.ctx.clearRect(0, 0, this.canvasInfo.width, this.canvasInfo.height) this.renderList.forEach(it => it.painting()) } addEvent () { const that = this let startX, startY canvas.addEventListener('mousedown', e => { startX = e.clientX startY = e.clientY let choosedIndex = null this.renderList.forEach((it, index) => { it.painting() if (this.ctx.isPointInPath(startX, startY)) { choosedIndex = index } }) if (choosedIndex !== null) { this.itemToLast(choosedIndex) } document.addEventListener('mousemove', mousemoveEvent) document.addEventListener('mouseup', mouseupEvent) this.painting() }) function mousemoveEvent (e) { const target = that.renderList[that.renderList.length - 1] const currentX = e.clientX const currentY = e.clientY target.adjust(currentX - startX, currentY - startY) startX = currentX startY = currentY that.painting() } function mouseupEvent (e) { const target = that.renderList[that.renderList.length - 1] const currentX = e.clientX const currentY = e.clientY target.adjust(currentX - startX, currentY - startY) startX = currentX startY = currentY that.painting() document.removeEventListener('mousemove', mousemoveEvent) document.removeEventListener('mouseup', mouseupEvent) } } } const yes = new demo(canvas) .rectangular({}) .rectangular({top: 60, left: 60, background: 'blue'}) .rectangular({top: 30, left: 20, background: 'green'}) .circle() .circle({center: [100, 30], background: 'red', radius: 5}) .painting() [/code]
到此这篇关于详解如何在Canvas中添加事故的方法的文章就介绍到这了,更多相干Canvas添加事故内容请搜索脚本之家以前的文章或继承欣赏下面的相干文章,盼望各人以后多多支持脚本之家! 来源:https://www.jb51.net/html5/771876.html 免责声明:如果侵犯了您的权益,请联系站长,我们会及时删除侵权内容,谢谢合作! |
 /6
/6 
 |手机版|小黑屋|梦想之都-俊月星空
( 粤ICP备18056059号 )|网站地图
|手机版|小黑屋|梦想之都-俊月星空
( 粤ICP备18056059号 )|网站地图
GMT+8, 2025-7-2 08:59 , Processed in 0.051603 second(s), 18 queries .
Powered by Mxzdjyxk! X3.5
© 2001-2025 Discuz! Team.